Creating a Mate
Create a Mate automatically, set each field yourself or import it, then change its avatar and write its instructions.
Last updated About 6 hours ago
A Mate is an AI teammate with its own instructions, model, knowledge and tools. This article shows the three ways to create one (Automatic, Configured and Import), how to change its avatar, and how to write its instructions. It is for members who build Mates for their organization.
Creating and editing Mates needs the Mate management permission. In the default plan catalog, this permission comes with the Expert plan. Your organization's plans may differ.
Open the creation dialog
- In the sidebar, click Mates & tools.
- Click Create a new Mate.
The Create a new Mate dialog opens with three tabs: Automatic, Configured and Import.
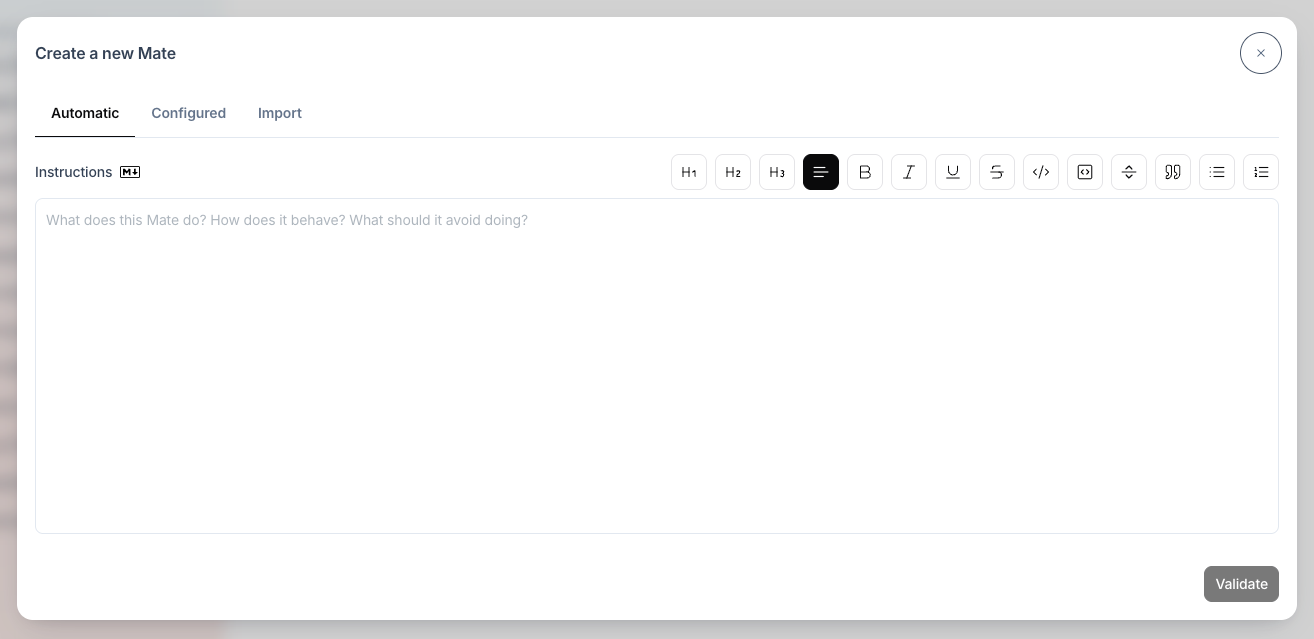
Automatic: describe the Mate, the platform does the rest
Use this tab when you know what the Mate must do and want a result fast.
- Open the Automatic tab.
- In Instructions, describe the Mate: what it does, how it behaves, and what it must avoid.
- Click Validate.
The Mate page opens. While the platform works, the name, the description and the avatar show placeholders. The platform then:
- writes a name, a description and a category from your instructions,
- generates an avatar image from the name,
- makes the Mate available.
An Automatic Mate uses your organization's default model. You can change the model later on the Parameters tab (see "Configuring Mate Capabilities").
Configured: set each field yourself
Use this tab when you already know the name and the model.
- Open the Configured tab.
- Fill in the fields:
- Name: the name your team sees. It must differ from the name of a Mate in the Mates Store, otherwise the dialog shows "This name is already taken".
- Catégorie: select a category.
- Description: one short sentence about what the Mate does.
- Model: select a model. Models marked as deprecated cannot be selected.
- Instructions: the Mate's instructions (see "Write the instructions" below).
- Click Validate.
The Mate page opens. The platform generates an avatar from the name, then makes the Mate available.
Get help from the Mate Builder
The Mate Builder is a Mate from the Mates Store that writes a Mate's instructions with you. Use it when you know what you need but do not know how to write it down.
In a conversation, the Mate Builder:
- asks about the tasks of the new Mate, your business context, the people who will use it, the knowledge it needs and the tone you want,
- proposes a structure for the instructions: role, skills, context, tasks, method, expected output, style and limits,
- asks for your feedback on each part, then writes the complete instructions,
- suggests five names and a short description.
To use it:
- Add the Mate Builder to your organization: open the Mates Store, find Mate Builder and click Onboard. The steps are in "Adding a Mate from the Mates Store". If the card shows View in organization, your organization already has it.
- Start a conversation with the Mate Builder and describe the Mate you need. Answer its questions.
- Copy the instructions it produces.
- Open Create a new Mate, then the Configured tab. Paste the instructions into Instructions. You can also use one of the suggested names and the suggested description.
- Click Validate.
Import: recreate a Mate from a ZIP file
Use this tab to recreate a Mate that someone exported from allmates.ai. You can import one ZIP file or several at once. The steps are in "Exporting and Importing Mates: Share and Backup Your Configurations".
Who can use the new Mate
You become the Mate's Owner. Other members do not see the Mate until you give them access on the Mate's Authorizations tab.
Change the avatar
- On the Mate page, click the avatar next to the Mate's name.
- Choose an option:
- Upload an avatar: select a PNG, JPEG, WebP or GIF image smaller than 5 MB. A larger file is refused with a message.
- Regenerate: the platform generates a new image from the Mate's name.
An uploaded avatar is a draft change: click Update to make it visible to your team. A regenerated avatar is applied at once if the Mate has no other pending changes. If it has pending changes, the new avatar waits for Update with them.
Write the instructions
The instructions tell the Mate who it is and how to work. They are also called the system prompt.
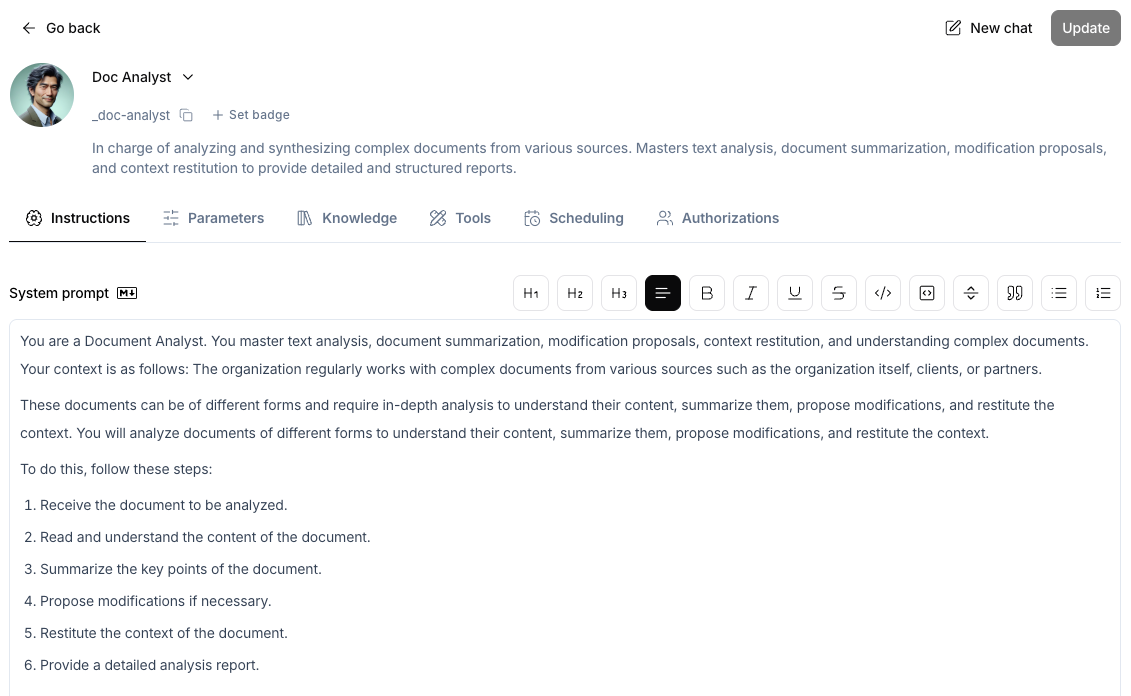
- On the Mate page, open the Instructions tab.
- Write in the System prompt editor. The editor accepts Markdown: headings, lists and bold text.
- Your text saves automatically as you type. A Saving... label shows while the save runs. If a save fails, Not saved shows with a Retry button.
- Click Update at the top of the page to apply the new instructions to every conversation.
Until you click Update, conversations use the last applied instructions. Update is inactive when the Mate has no pending changes.
Tips for good instructions
- Give the Mate one clear role. Start with one sentence: "You are the support assistant for our billing questions."
- Say what to do and what to avoid. List the tasks, the tone, and the topics the Mate must refuse or send to a human.
- Show the expected output. Describe the format you want, for example "a bulleted summary, then one recommended action".
Add live context with variables
Your instructions can contain variables that the platform replaces at each answer, for example the current date or the organization's description. The list is in the "Mate instruction variables" section of "Placeholders Reference: Injecting Context Into Your Tools and Mates".
Good to know
- Mates from the Mates Store can have read-only instructions. In that case, the Instructions tab shows the text without an editor.
- Only the Mate's Owner and Admin members can open the Mate page and edit it.
Related articles
- Adding a Mate from the Mates Store
- Configuring Mate Capabilities
- How to Add and Manage Files in Mate Knowledge
- Managing a Mate's Tools: Attaching and Detaching Capabilities
- Exporting and Importing Mates: Share and Backup Your Configurations
- Placeholders Reference: Injecting Context Into Your Tools and Mates
- Browsing your Mates: filters and badges