Deploying a Custom MCP Server in Your Organization
The complete manual for connecting a custom MCP server to allmates.ai: what MCP is and how it works, every authentication option, what members see, and how to troubleshoot.
Last updated 9 days ago
Who this guide is for
This is the complete manual for connecting a custom MCP server to allmates.ai — from understanding what MCP actually is, to choosing the right authentication method, to what your team members will see the first time a Mate uses the tool.
It is written for two audiences, and it says clearly which is which:
Organization admins who install and configure the tool (Parts 1 to 4, 6, 7).
Members who simply use a Mate that has the tool attached (Part 5 — you can jump straight there).
You do not need to be a developer to follow this guide. You do need someone who can tell you the MCP server's URL and how it expects to be authenticated — usually the vendor's documentation, or your own IT team if the server is internal.
How this fits with our other articles:
"Connecting Apps with MCP Tools (OAuth)" covers the easy case: an MCP integration we already publish in the Tool Store (HubSpot, Jira, Slack…), where you click, sign in, and you're done. If the app you need is already in the store, read that article instead — you don't need this one.
This guide covers the case where it is not in the store: any MCP server, yours or a vendor's, that you connect yourself by URL.
"Personal and shared tool authentication" explains the two OAuth modes, the shared connection panel and who can read which credential. This guide applies it to MCP servers.
"Master the REST API Tool" describes the REST API Tool, a different mechanism. Where the two differ in an important way, we say so here.
"Placeholders Reference" is the complete reference for the credential slots described in Part 4 — read it when you want the exact syntax and every available scope.
Part 1 — What MCP is, in plain language
Skip this part only if you already run MCP servers in production. Everything after it will make more sense if you read it.
1.1 The problem MCP solves
A language model, on its own, can only produce text. It cannot read your CRM, query your data warehouse, or create a ticket. To do any of that, something has to connect the model to those systems.
Before MCP, every connection was bespoke. If you had 5 AI products and 20 internal systems, you needed up to 100 custom integrations — each one written, tested, and maintained separately. Change the API of one system, and you break every AI product that touched it.
  Without MCP: every AI app needs its own connector for every system

   AI app A --+--> CRM              AI app B --+--> CRM
              +--> Data warehouse              +--> Data warehouse
              +--> Ticketing                   +--> Ticketing
              +--> File storage                +--> File storage

   5 apps x 20 systems = up to 100 integrations to build and maintain
MCP (Model Context Protocol) is an open standard, now adopted across the industry, that replaces those bespoke connectors with one common language. Each system is exposed once as an "MCP server". Each AI product speaks MCP once. Any AI product can then talk to any system.
  With MCP: one standard in the middle

   AI app A --+                        +--> CRM (MCP server)
              +--> [ MCP protocol ] ---+--> Data warehouse (MCP server)
   AI app B --+                        +--> Ticketing (MCP server)
                                       +--> File storage (MCP server)

   5 apps + 20 systems = 25 things to maintain, not 100
The analogy that works best: MCP is the USB-C port of AI applications. Before USB, every device had its own cable. Now one port shape works for a keyboard, a screen, a hard drive, or a charger. You don't need to know how a screen works internally to plug it in — you just need the right port and, sometimes, permission to use it. MCP is that port, for AI.
1.2 The four words you need
A single MCP server usually exposes many tools. The Qlik MCP server, for instance, exposes a dozen or so. You connect the server once; your Mates get all of its tools.
MCP servers can also expose resources (documents or data the model can read) and prompts (ready-made instruction templates). Tools are by far the most common and the most useful, and they are what this guide focuses on.
1.3 What actually happens when a Mate uses an MCP tool
This is the part most people get wrong, so here it is step by step. Imagine you ask a Mate: "How many open support tickets do we have in France?"
  You                  Mate (allmates.ai)            MCP server         Your ticketing system
   |                          |                          |                        |
   |  "open tickets, France?" |                          |                        |
   |------------------------->|                          |                        |
   |                          |  1. "What can you do?"   |                        |
   |                          |------------------------->|                        |
   |                          |<-------------------------|                        |
   |                          |  list of tools + inputs  |                        |
   |                          |                          |                        |
   |                     2. the model decides:           |                        |
   |                     "call search_tickets with       |                        |
   |                      status=open, country=FR"       |                        |
   |                          |                          |                        |
   |                          |  3. call search_tickets  |  4. real query,        |
   |                          |------------------------->|----------------------->|
   |                          |                          |     as an identity     |
   |                          |<-------------------------|<-----------------------|
   |                          |  5. result (JSON)        |                        |
   |                          |                          |                        |
   |   6. written answer      |                          |                        |
   |<-------------------------|                          |                        |
Five things follow from this diagram, and they drive every decision later in this guide:
The connection is live. The Mate queries the system at each request, so the answer reflects the current data. If a ticket is closed one second before you ask, the answer reflects it.
The model chooses which tool to call, and with which arguments. You don't script it. That is why the tool descriptions written by the server's authors matter so much — a badly described tool gets called badly, or never.
Step 4 happens under an identity. The MCP server has to know who is asking, to decide what it is allowed to return. That identity question is exactly what "authentication" means in Part 3, and it is the single most important decision you will make.
A custom MCP server is a third-party or internal service. It can change, break or go offline without warning, so the platform shows a trust warning when you add one.
Data flows out of your organization to whatever the MCP server is, and results flow back into the conversation. Treat adding an MCP server with the same seriousness as granting an application API access to that system.
1.4 What MCP is not
Clearing up the five most common misunderstandings:
It is not a data import. Unlike Mate Knowledge, you upload nothing: the Mate queries the system when it needs to.
It is not an agent. An MCP server has no intelligence and makes no decisions. It offers capabilities; the Mate decides whether and how to use them.
It does not run on your computer. In allmates.ai, MCP servers are remote services reached over HTTPS. Desktop tools like Claude Desktop also support local ("stdio") servers that run on your machine — those cannot be used here. See section 1.6.
It is not a security bypass. An MCP server can only ever do what the credentials you give it allow. If you connect with a read-only account, nothing can write.
It is not automatic. Attaching a tool to a Mate does not make the Mate use it well. Good instructions on the Mate still matter.
1.5 MCP tool vs REST API tool — which one do you need?
allmates.ai supports both. They solve the same problem from opposite ends.
Rule of thumb: if the service you want to connect publishes an MCP server, use an MCP tool. Use the REST API tool only when it doesn't. Vendors are shipping MCP servers fast — check their developer documentation for "MCP" before you write a single line of OpenAPI.
1.6 Transports: what allmates.ai supports
"Transport" is how the client and the server talk to each other over the network. You'll see the term in vendor documentation.
Why stdio is not supported. allmates.ai only connects to MCP servers reachable by an https:// URL. If a tool only exists as a stdio server (many npx/uvx-based servers are), your IT team must expose it behind an HTTPS endpoint first.
How to tell them apart: the vendor gives you a URL. A URL ending in /sse is usually the legacy transport; anything else (/mcp, /api/mcp, /v1/mcp…) is usually Streamable HTTP. When in doubt, start with the default and only switch if the connection fails.
1.7 How the pieces fit together in allmates.ai
Three objects, in this order. Getting them straight saves a lot of confusion later.
   STORE TOOL             TOOL INSTANCE                   MATE
   (the template)   -->   (your configured connection) --> (the collaborator using it)

   "Custom MCP server"    "Qlik - Sales tenant"           "Sales Analyst"
   "Qlik (official)"      "Qlik - Finance tenant"         "CFO Assistant"
                          "Internal ticketing"
A Store tool is a template in the Tool Store. Some are ready-made integrations published by us; one of them, "Custom MCP server", is the blank template you use for any MCP server.
A tool instance is your actual, configured connection: a URL, credentials, a name, a description. This is what this guide teaches you to create. You can create several instances of the same template — one per tenant, per environment, per team.
A Mate gets the tool instance attached to it, and can then call its tools in conversation.
Two consequences worth remembering:
Instances are independent. A "Production" instance and a "Sandbox" instance of the same MCP server have separate credentials and separate permissions.
Attaching is what makes a tool usable. An instance nobody attached to a Mate does nothing.
Part 2 — Before you click anything
Ten minutes here saves an hour of debugging later.
2.1 What you must have in hand
If you can't answer #3, stop and find out before going further. Everything else is quick; guessing authentication is what wastes afternoons.
2.2 Which authentication does your server use?
Read the server's documentation and match it against this table. The right-hand column is what you will choose in allmates.ai.
If the documentation is unclear, try No Auth first: if the server requires credentials, the very first tool call will fail with an explicit error and you can come back and add them.
2.3 The one decision that really matters: whose identity?
When the MCP server reaches into the underlying system (step 4 of the diagram in 1.3), it acts as someone. You choose who.
Option A — a shared organization identity. One set of credentials, used by everyone. Whoever asks the Mate, the server sees the same identity.
Set it up once, works for everyone immediately, no action required from members.
But everyone sees the same data. If the underlying system has per-user permissions, they are bypassed — the tool returns whatever that shared account can see, to anyone who can use the Mate.
Good for: public data, read-only reporting on shared dashboards, a service account intentionally scoped to what the whole team may see.
Dangerous for: HR records, individual mailboxes, anything where "who is asking" changes what the answer should be.
Option B — a personal identity per member. Each member connects with their own account. The server sees Marie when Marie asks, and Thomas when Thomas asks.
The underlying system's own permissions apply, untouched. Marie sees Marie's data.
Auditable on the vendor's side: their logs show real users.
But each member must connect once before their first use (the platform prompts them; it takes seconds).
Good for: anything user-scoped — CRM, mailbox, personal drive, BI tools with row-level security.
In the interface, this appears for OAuth as OAuth token scope, with two buttons: Personal (the default, "Each member connects their own account.") and Shared ("Everyone allowed to use this tool uses one connected account."). For API keys and headers, the equivalent choice is the header Scope: Member or Organization. See 4.7.
You can change the OAuth token scope later. A tool manager can switch an instance from Personal to Shared, or back, from its settings. The app asks for a confirmation first, because the switch changes whose account the tool uses (6.1).
Our recommendation: personal identity per member by default. It is the privacy-safe answer and the platform's default. Choose Shared when one service account, scoped on purpose to what the whole team may see, is the right identity.
2.4 Who is allowed to do this
Creating a tool instance requires tool-management rights in your organization (the Expert plan by default; your organization's plans may differ). Once the instance exists, access to it is governed by the tool authorization roles described in "Mastering Tool Authorizations":
Today, an Admin sees Edit and Delete on the tool, but only an Owner can save a settings change, change the authorizations or delete the tool. An Admin can manage the shared OAuth connection (4.4.4).
Remember the golden rule: tool roles control management, Mate access controls usage. Anyone who can talk to a Mate can use the tools attached to it, even with no direct role on the tool.
Two additional rules specific to MCP:
Only an organization admin can fill in organization-wide credentials during setup. If someone without that right tries to install a tool that needs them, the platform stops them with: "Admin-managed credentials are required for this tool. Ask an organization admin to complete the setup."
Organization-wide credentials are readable by the tool's Owners and Admins, so that they can be reviewed and updated. Treat the Owner/Admin roles on a tool as "may see this tool's shared secrets", and grant them accordingly. See 4.7 for who can read what.
2.5 Trust: the question to ask before adding any server
The platform shows this warning for a reason:
Only add MCP servers from developers you trust. Remote tools can change outside AllMates.
An MCP server you connect can, within the limits of the credentials you give it:
read anything those credentials can read, and send it into a conversation;
change what its tools do, and how they describe themselves, at any time, without telling you;
influence a Mate's behaviour through the text it returns (a known class of attack called "prompt injection" — a malicious server can return text designed to look like instructions).
Before adding a server, ask:
Who publishes it? The vendor of the system itself (best), a well-known open-source project (good), or an unknown third party (be careful).
What credentials am I giving it? Apply least privilege: read-only when reading is enough, a dedicated service account rather than a personal admin account, the narrowest OAuth scopes the tool actually needs.
What would a worst case look like? If this server were compromised tomorrow, what could an attacker reach with the credentials I just gave it? If the answer is uncomfortable, narrow the credentials.
Do I need it in production, or in a sandbox first? Create a sandbox instance, attach it to a test Mate, and try it before rolling it out.
Part 3 — Deploy your MCP server, step by step
Step 1 — Open the custom tool dialog
In the sidebar, open Mates & tools, then Toolbox.
Click Connect tool.
Choose Add custom tool.
The dialog opens directly on Add custom MCP server — the Streamable HTTP setup, which is what you want in the vast majority of cases.
Need something else? The Other custom tool paths button at the bottom of the dialog offers REST API (for services with no MCP server — see "Master the REST API Tool") and Use legacy SSE (for MCP servers that only offer the SSE transport). Back to MCP setup returns to the MCP form.
Step 2 — Enter the server URL
Paste the MCP server URL in MCP server URL. It must be a public https:// address, for example:
https://tenant.example.com/api/ai/mcpTake the URL exactly as the vendor gives it — don't add or trim path segments. If the URL ends in /sse, go back and pick Use legacy SSE instead.
Under the field you'll see the trust reminder from 2.5. Read it, and mean it.
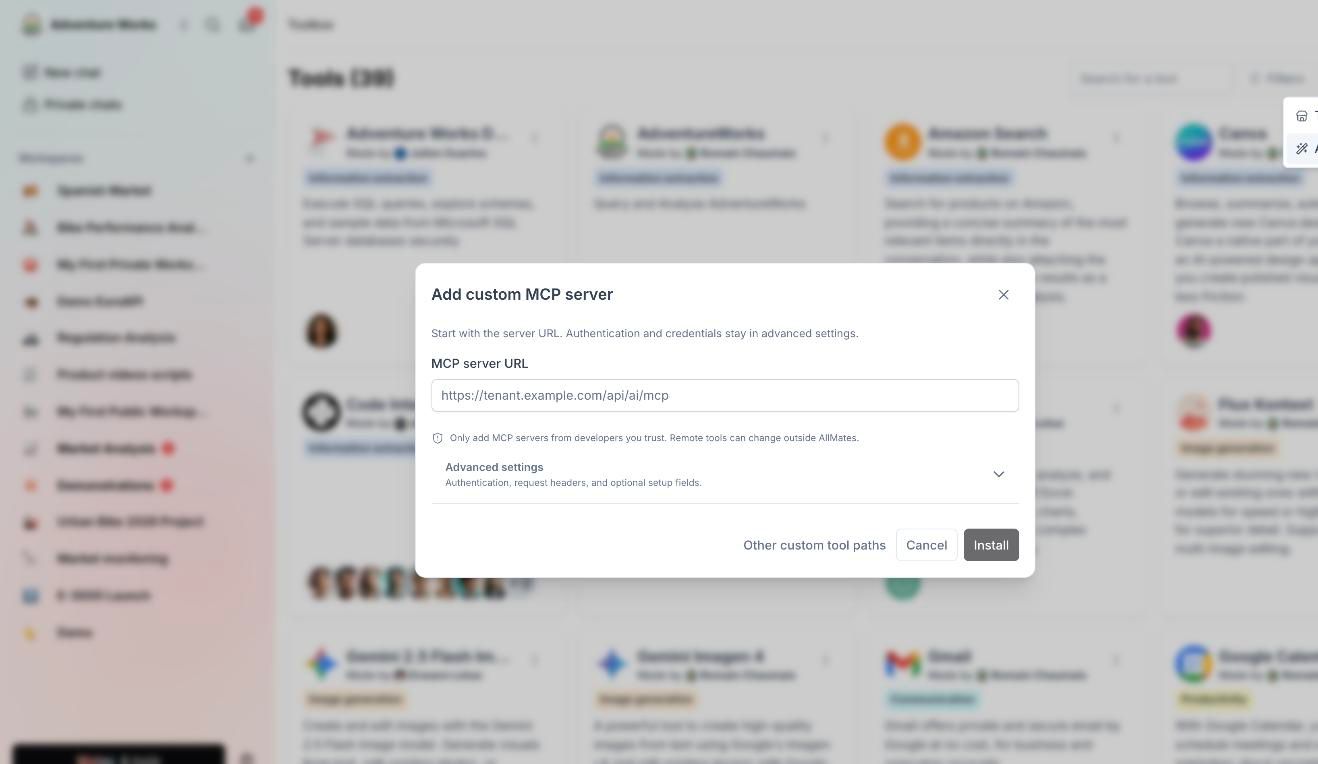
Step 3 — Open Advanced settings and configure authentication
Everything about credentials lives behind the Advanced settings accordion ("Authentication, request headers, and optional setup fields.").
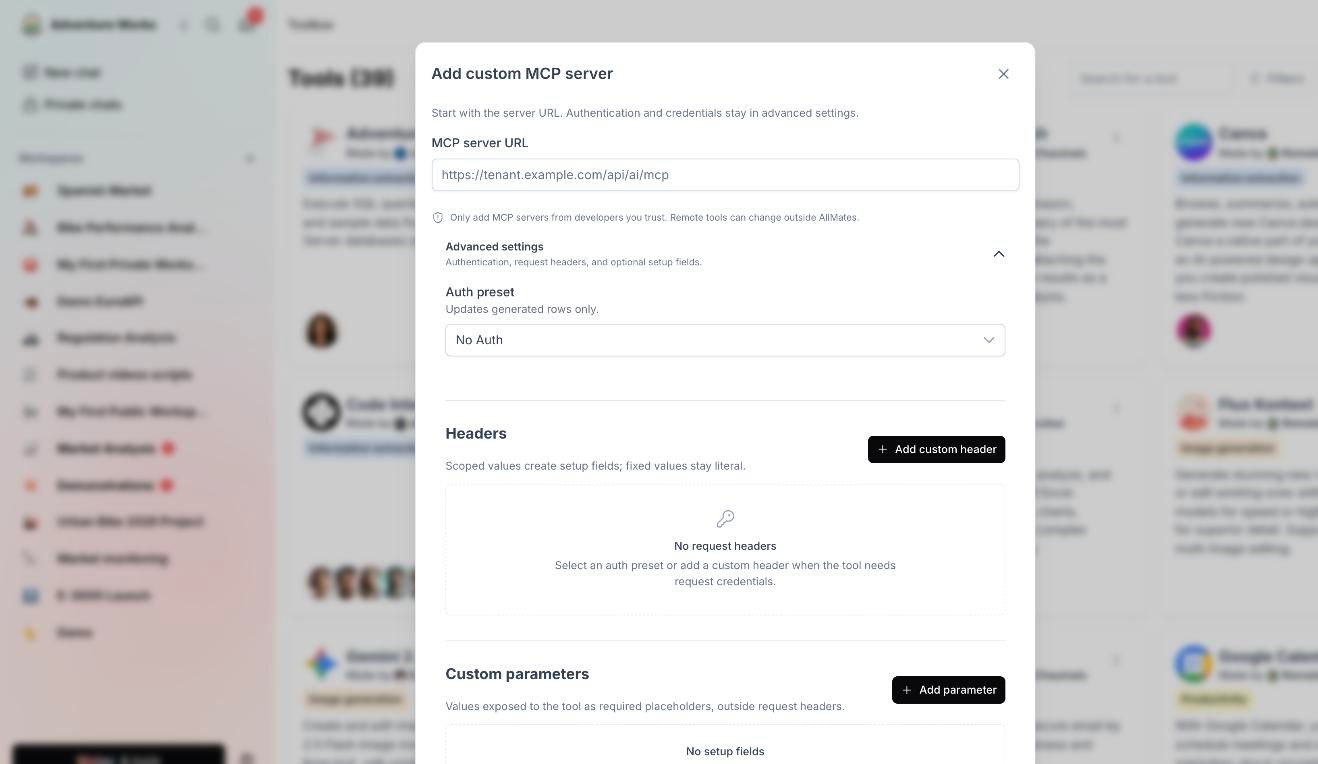
Open it and start with Auth preset:
Need a header that is not Authorization: Bearer — say X-Api-Key? Leave the preset on No Auth and add the header manually under Headers. Full recipe in 4.3.
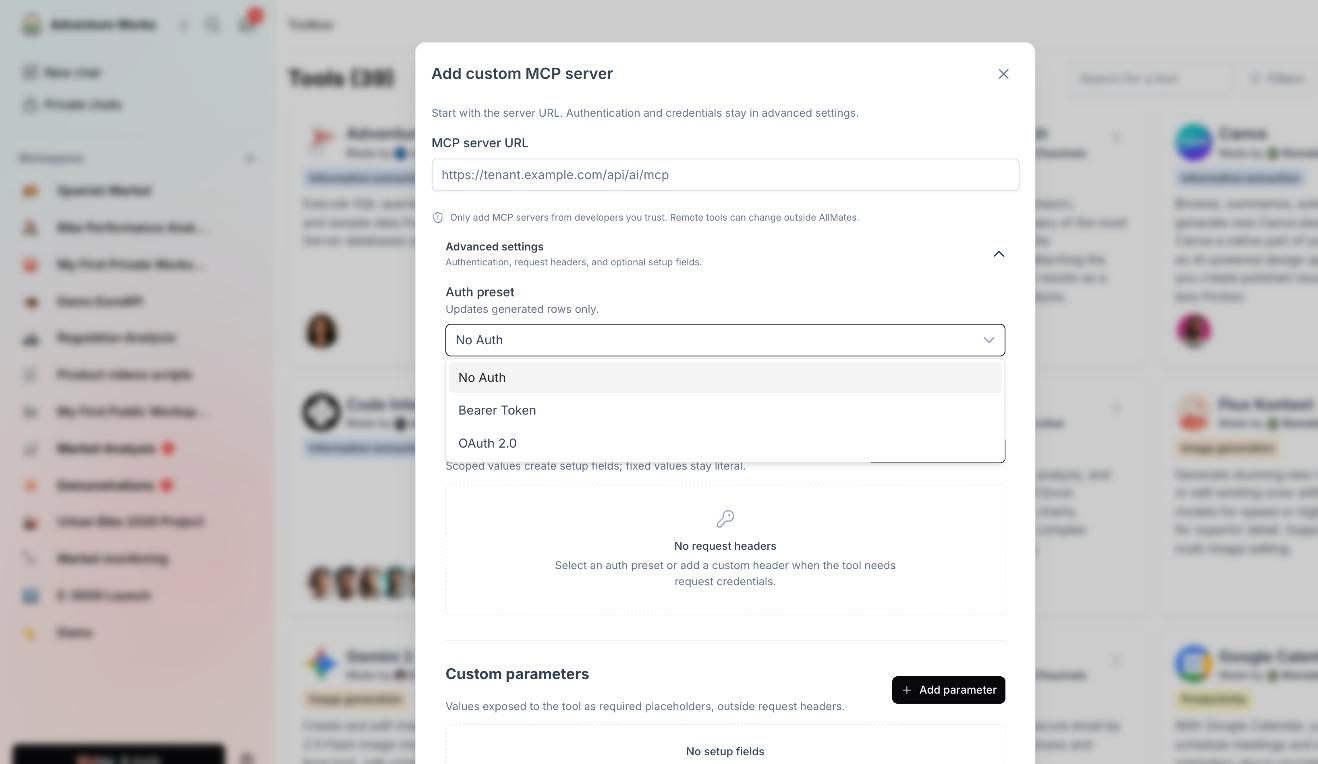
Part 4 covers each option in complete detail. Configure yours now, then come back here.
Step 4 — Install
Click Install.
There is no name to fill in: the platform sets the instance's name, description and icon for you. A toast confirms it — "Info detected automatically".
Take one minute to rename it anyway. Open the instance's settings and give it a name that will still make sense to a colleague in six months: Qlik — Sales tenant (read-only) beats Qlik. The name and description are shown to your members, and the description is also read by the Mate — a clear one measurably improves how well the Mate uses the tool. This matters as soon as you have two instances of the same server.
Step 5 — Attach it to a Mate
Right after installation, the tool attachment dialog opens. Click the card of each Mate that needs the tool, then click Save access. Do it — an instance attached to nothing does nothing. You need editor rights on a Mate to attach a tool to it.
You can also do it later, from either side:
From the tool: open the instance in the Toolbox, then the Mates tab, then Add a Mate.
From the Mate: Mates & tools > Organization's Mates, select the Mate, open the Tools tab, then Add a tool.
Attaching or detaching a tool takes effect at once. If the Mate has unpublished draft edits, the tool change also deploys them.
Attach the tool to the Mates that genuinely need it, not to all of them. A Mate with twenty tools chooses worse than a Mate with three.
Step 6 — Test it, as a real user would
Open a chat with the Mate.
Ask something that clearly requires the tool: "List the last five records from <system>".
Watch what happens:
A result appears — you're done. Check that the result is what that identity should be able to see.
A connection prompt appears — expected with per-member authentication. Connect, then retry. Part 5 summarizes what your members will see.
An error appears — Part 7 lists every error message with its cause and fix.
Test with a second member too, ideally one with fewer permissions than you. That is how you verify your identity choice from 2.3 actually behaves as intended.
Part 4 — Every authentication option in detail
4.1 No authentication
When: public MCP servers, or servers that need no credential from the caller.
How: leave Auth preset on No Auth. Nothing else to fill in.
What to check: confirm the server really is meant to be open. A server that responds without credentials is not necessarily a server that is supposed to. If it exposes anything sensitive, insist on authentication before connecting it.
4.2 Bearer token (the most common API key case)
When: the documentation says to send Authorization: Bearer <your-token>.
How:
Set Auth preset to Bearer Token. A header row is created for you, pre-filled with the
Authorizationkey and theBearerprefix.In the Scope column, decide where the token comes from — this is the 2.3 decision:
Leave the Type on Sensitive (the default for this preset) so the value is masked in the interface.
The Placeholder key is pre-filled with
bearerTokenand the Placeholder label withBearer token. Rename the label to something your members will recognise — it is the exact text they are shown when asked for the value.Your Acme API keybeatsBearer token.
Avoid "Fixed value" for real secrets. A fixed value is visible to anyone who edits the tool. Use it only for non-sensitive constants (Accept: application/json, a tenant identifier, an API version). For anything secret, choose Organization or Member.
Concrete example — one shared API key for the whole organization:
You then enter the key itself in the organization credentials section that appears in the same dialog. Afterwards, only the tool's Owners and Admins can see it again (4.7).

4.3 Custom headers (any other header name)
When: the server expects its key somewhere other than Authorization: Bearer — X-Api-Key, api-key, X-Tenant-Id, and so on. Many APIs need two or three headers together.
How: under Headers, click Add custom header and fill one row per header. Each row has:
Concrete example — a RapidAPI-style server with two headers:
The host is a non-secret constant, so a fixed value is right. The key is a secret shared by the organization, so it uses the Organization scope.
Concrete example — each member uses their own personal token:
Each member will be asked for their own token the first time a Mate tries to use the tool (Part 5).
4.4 OAuth 2.0
When: the server asks users to sign in with an account rather than paste a key. This is the richest option and the one worth setting up properly — it gives you real per-user identity, tokens that expire and refresh automatically, and revocation from the provider's side.
Set Auth preset to OAuth 2.0. A new choice appears: OAuth setup, with two modes.
4.4.1 Auto discovery (try this first)
How it works. Auto discovery finds the server's sign-in settings for you. With many servers, there is nothing to fill in.
If the server supports Dynamic Client Registration, you fill in no client ID and no client secret.
What you do: select Auto discovery, and try it. If it works, you're done.

When you still need to fill something in. Some providers require you to create the OAuth application yourself in their admin console — HubSpot is a well-known example. Open the OAuth client section and provide:
4.4.2 Manual setup
When: discovery isn't supported by the server, or you want explicit control over every endpoint.
Select Manual and fill in:

Resource indicator is optional. Fill it in only when the provider's documentation explicitly tells you which audience to request — typically when one authorization server protects several APIs and the token has to name the right one. Always request an offline/refresh scope when the provider offers one (often offline_access). Without it, the provider issues no refresh token, and every member has to reconnect manually as soon as their access token expires.
4.4.3 The redirect URL — the step most often forgotten
The form shows a read-only Redirect URL with a copy button, and the instruction "Copy this URL into the provider OAuth app settings."
Copy the Redirect URL from the form and add it to the allowed redirect URLs of your provider's OAuth app.
If you skip this, the provider will reject every connection attempt with an error along the lines of "redirect_uri mismatch". It is the single most common OAuth setup mistake.
4.4.4 OAuth token scope — personal or shared
This is the 2.3 decision, in its OAuth form. Two buttons under OAuth token scope:
With Personal, each member is prompted to connect the first time a Mate needs the tool, and the tool then acts under their own account.
With Shared, the dialog warns you: "Your own provider account will be used for tool calls made by other authorized members." Click Save and connect my account in the Shared OAuth connection panel and sign in once. If you install the tool with Shared selected, the app asks right away: Connect the shared account now? Choose Connect my account, or Later to connect from the tool settings. Members are not prompted to connect: the tool uses the shared account for everyone allowed to use it.
A tool manager is a member whose plan allows tool management (the Expert plan by default) and who is Owner or Admin of the tool. The panel statuses, the Reconnect my account, Replace with my account and Disconnect shared account actions, and what members see are described in "Personal and shared tool authentication".
An API key or header with the Organization scope (4.2, 4.3) is another way to give everyone one shared identity, when the server supports that form of authentication.
You can switch between Personal and Shared later (6.1).
4.5 Combining several methods
Real-world servers sometimes need more than one thing at once — for instance OAuth for the user identity, plus a fixed tenant header. That's fine: Auth preset and the Headers table are independent. Set the preset to OAuth 2.0 and add your extra headers underneath.
The same applies to several headers with different scopes: a Member-scoped token and an Organization-scoped account identifier can coexist in the same instance.
4.6 Setup fields (custom parameters)
Some servers need a value that is not a credential and not a header — a tenant ID appended to the URL, a default region, a project name.
Under Custom parameters, add one entry per value, with a scope of Member or Organization exactly as for headers. These appear in the same setup dialogs as credentials and follow the same scopes.
4.7 Who can see each secret
A Fixed value is visible to anyone who can edit the tool: never put a secret in it. Organization credentials are visible again to the tool's Owners and Admins, so that they can review and correct them: give those roles accordingly. Member credentials are visible to that member only. A saved OAuth client secret is never shown again: you replace it, you do not edit it.
The full rules are in "Personal and shared tool authentication".
For the exact placeholder syntax behind these scopes — {{member.toolInstance.…}}, {{organization.toolInstance.…}}, {{instance.…}} — and every other placeholder available on the platform, see "Placeholders Reference: Injecting Context Into Your Tools and Mates".
Part 5 — What your members will see
This part is for everyone, not just admins. If you're a member wondering why a Mate is asking you for something, you're in the right place.
Members never configure an MCP server. Depending on the choices the admin made, they may be asked for one thing, once.
Connect my account (OAuth, personal authentication): the first time a Mate needs the tool, the reply offers to connect the member's own account. The Mate then continues on its own.
Save credentials (API key, personal scope): the reply asks for the fields the admin defined, for example "Your personal token". The member fills them in, clicks Save credentials, then Retry request.
Shared connection: members are never asked to connect. When the shared connection is missing or broken, the reply asks them to contact a tool manager.
Each member manages what they connected or saved in Account > Connections.
Every message, button and the Connections page are described in "Personal and shared tool authentication".
5.1 When the answer is "ask your admin"
Some messages mean the ball is not in your court:
Forward the message to whoever administers the tool. Part 7 tells them what to do.
Part 6 — Operating the tool over time
6.1 Editing an instance
Open the tool instance and edit its settings. You can change the name, description, server URL, authentication mode, headers and setup fields. Only the tool Owner can save these changes (2.4).
Two things behave differently from the rest:
The OAuth token scope (Personal vs Shared) can be changed by a tool manager, after a confirmation. Switching to Personal asks Switch to personal authentication?: "The shared account connected by <member> will be disconnected once you save. Each member will then have to connect their own account." Switching to Shared asks Switch to shared authentication?: "Personal connections will no longer be used. Once you save, connect the account that everyone allowed to use this tool will share." Other members see the setting locked: "Only a tool manager can change this setting."
The OAuth client secret cannot be edited, only replaced: leave the field empty to keep the current one, or type a new one. Once a secret is saved, the form tells you: "A client secret is saved but cannot be displayed again. Leave this field empty to keep it, or enter a new secret to replace it." Other credential fields are shown with their current value and can be corrected in place (4.7).
6.2 Rotating credentials
Rotation is a replacement, in this order:
Create the new key/secret in the provider's console — don't revoke the old one yet.
In allmates.ai, enter the new value in the relevant field and save.
Test with a Mate.
Only then, revoke the old key on the provider's side.
For OAuth client secrets, the form reminds you: leave the field empty to keep the current secret, type a new one to replace it.
Set yourself a rotation schedule that matches your organization's security policy, and rotate immediately on any suspicion of exposure or when someone with access leaves.
6.3 Multiple instances of the same server
Create as many as you need — they are independent:
Qlik — Production (read-only)andQlik — SandboxTicketing — Support teamandTicketing — Engineering, with different service accountsone instance per client tenant, for an agency
Give each a name and description that makes the difference obvious, and attach each to the right Mates.
6.4 Removing a tool
Before deleting an instance, check which Mates use it — deleting breaks them silently from the user's point of view. Detach it from those Mates first, then delete. Only the tool Owner can delete.
Deleting the instance does not revoke anything on the provider's side. If you want the access truly gone, also revoke the key or the OAuth authorization in the provider's console.
6.5 Ongoing review
Once a quarter is a reasonable cadence:
Unused instances — remove them. Every extra tool is extra attack surface and extra confusion for Mates.
Over-broad scopes — has the tool accumulated permissions it doesn't use?
Access roles — who is Owner/Admin on each instance? Do those people still need it?
Server changes — has the vendor changed its tools, its URL, or its authentication? MCP servers evolve outside allmates.ai.
Part 7 — Troubleshooting
7.1 Errors shown in the conversation
7.2 Symptom-based diagnosis
Nothing happens — the Mate answers without using the tool. Check that the instance is actually attached to this Mate, that the Mate's instructions don't discourage tool use, and that your question clearly requires it. Ask more explicitly: "Use <tool name> to…".
"Not configured correctly" right after installation. Almost always the URL or the transport. Verify the URL character by character against the vendor's documentation. If it ends in /sse, recreate the instance with Use legacy SSE. If the server is internal, verify it is reachable from the public internet over HTTPS — a server only reachable from your VPN cannot be reached by allmates.ai.
OAuth: the provider rejects the connection. Nine times out of ten, the redirect URL was not added to the provider's OAuth app (4.4.3). Copy it again from the form and check it matches exactly, including https:// and any trailing path.
OAuth: members have to reconnect all the time. The provider isn't issuing refresh tokens. Add the offline/refresh scope (often offline_access) to the scopes list and have one member reconnect to test.
The tool works for me but not for a colleague. Expected with personal authentication: they need to connect their own account. If they have connected and it still fails, the difference is on the provider's side — their account probably lacks permission on the underlying data.
A Shared tool stops working for everyone. Open the tool settings and read the status of the Shared OAuth connection panel. Revoked, Refresh failed, Member unavailable or Connection unavailable each mean the shared account needs a tool manager: reconnect it, or replace it with your own account.
The tool returns less data than the same account sees in the native application. Check the OAuth scopes, or the permissions of the service account behind the API key. Least privilege cuts both ways.
It worked yesterday, it doesn't today, and nothing changed here. The MCP server changed. Check the vendor's status page and changelog. This is the normal cost of depending on a remote service.
7.3 What to gather before contacting support
The tool instance name, and the exact error message (a screenshot of the conversation is ideal).
The MCP server URL and its vendor.
Which authentication option you configured, and which scope (personal / shared).
Whether it ever worked, and what changed since.
Whether it fails for everyone or just one member.
Part 8 — Security checklist
What remains your responsibility:
Choosing trustworthy servers (2.5). We cannot vouch for a third-party server you add.
Least privilege — read-only credentials and narrow scopes whenever possible.
The identity decision (2.3) — shared authentication bypasses the underlying system's per-user permissions, by design. Use it deliberately.
Rotation (6.2) and access review (6.5).
Revoking on the provider's side when you remove a tool (6.4).
Appendix A — Glossary
Appendix B — Pre-flight checklist
Before you install:
I have the MCP server URL, in
https://I know the transport (Streamable HTTP by default)
I know which authentication the server expects (2.2)
I have the credentials, or the OAuth app is created in the provider's console
I have decided: shared identity or personal identity per member (2.3)
For OAuth with Shared: I am ready to connect the account that everyone will use (4.4.4)
For OAuth: the redirect URL is allow-listed in the provider's OAuth app (4.4.3)
For OAuth: an offline/refresh scope is requested if the provider offers one
The credentials are scoped to the minimum needed
I trust the publisher of this server (2.5)
I know which Mates will get it, and which won't
After you install:
Tested in a real conversation
Tested by a second member, with different permissions
Instance name and description are clear to a colleague
Tool authorization roles reviewed (2.4)
Credential rotation date noted
Appendix C — Related reading
Connecting Apps with MCP Tools (OAuth) — the one-click path for MCP integrations already published in the Tool Store
Placeholders Reference: Injecting Context Into Your Tools and Mates — the full reference for credential and context placeholders
Introduction to Tools — the Tools ecosystem, Tool Store and Toolbox
Discovering the Tool Store — browsing and installing ready-made tools
Creating and Managing Tool Instances — instance lifecycle, naming, attaching to Mates
Personal and shared tool authentication — the shared connection panel, its statuses, and who can read each credential
Mastering Tool Authorizations — the Owner/Admin/User/List role matrix in full
Master the REST API Tool — the alternative for services with no MCP server
Qlik Official MCP Server — a complete, worked example of an OAuth MCP integration
Was this helpful?
Still need help? Ask the team